Table of Contents
Fundamentally there are a couple different types of riflescopes. There are tactical optics (red dots, acogs, eotechs, etc), hunting scopes, low powered variable optics (LPVOs) and precision/high power scopes. Tactical optics are entirely their own thing and out of scope of this post. The other three are fundamentally the same, mechanically speaking, but have different feature sets to serve different purposes.
Hunting scopes are typically simple and designed to be used to make shots at point blank range, typically inside 100 meters. This style of scope typically doesn’t allow for windage and elevation adjustments in the field and usually features a very simple crosshair. This is the kind of scope you zero once and the beginning of hunting season and don’t touch again.
Low powered variable optics (LPVOs) are “tactical” riflescopes. As the name implies they’re optics with an adjustable magnification from 1x to 8x. They’re designed for relatively short range engagements (with 600 meters) on the battlefield or in competition.
High powered scopes are, as the name implies, designed for long range shooting. They typically feature more adjustments, better optics and a more complex reticle.
Why wouldn’t you always choose the highest magnification optic available? Simply put high magnification optics make it harder to acquire targets quickly because your field of view becomes so small. This makes it harder to find targets and ensure you have the correct target, especially at closer ranges.
Along those same lines, more magnification also means more magnification of your movements. Your scope’s field of view will move more every time you make a slight adjustment. That’s an absolute nightmare when doing close range target shooting, tactical shooting or hunting.
Mechanical understanding and operation of scopes
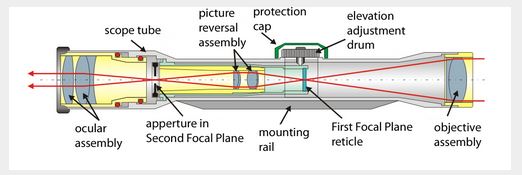
Light enters the scope through the objective assembly. The larger the objective assembly, the brighter the target will be. This is especially important if you’re shooting in low light conditions such as under a forest canopy, at dusk or at dawn.
A larger objective assembly can also require taller mounting rings which increases your height over bore. It also reflects more light making you and your scope more visible outdoors. Everything’s a trade-off.
The light from the objective lens is then focused onto the First Focal Plane, which is also the entrance of the erector assembly. The erector assembly can be thought of as a mini-scope inside your rifle scope. The rear lens of the erector assembly is known as the Second Focal Plane.
On a technical note, due to the nature of lenses the image is flipped upside down when it enters the erector assembly and is flipped again so that it’s right side up when it exits the erector assembly.
When you’re making adjustments to your scope, you’re actually causing the erector assembly to move inside of your scope. Typically this is accomplished by turning machine screws in turrets which push against springs between the scope body and erector assembly.
The elevation turret is, by convention, located on the top of the rifle scope. The windage turret is, also by convention, located on the right of the rifle scope. Turning the elevation turret clockwise will push the point of impact down. Turning it counter-clockwise will push the point of impact up. Turning the windage turret clockwise will push the point of impact left, turning the windage turret counter-clockwise will move the point of impact right.
A shooter can damage their scope unknowingly by over-tightening the scope rings on his rifle scope. If scope rings are over-tightened then the scope’s tube can become dented and prevent the erector assembly from moving. This symptom of this is that the shooter makes adjustments but no change is visible in the scope or the target. Always follow the tightening specifications of the ring and scope manufacturer to avoid this. [Obviously also always use the correct size of rings and use high quality rings.]
A First Focal Plane Scope means that the reticle is on the entrance lens of the erector assembly. A Second Focal Plane Scope means that the reticle is on the exist lens of the erector assembly. On a First Focal Plane Scope the reticle is in front of the zoom — the result of this is that the reticle grows in relation to the target you are looking at. On a Second Focal Plane Scope the reticle is behind the zoom, the effect being that the reticle remains the same size as the target increases.
On a practical level, a second focal plane scope’s reticle stays sharper as it’s zoomed in but because the reticle changes size, and distancing marks in the reticle (mils, moa, whatever) also change in size requiring you to mentally account for the magnification in your ranging. On a first focal plane scope, ranging marks (mils, moa, whatever) remain the same size are thus true and accurate for the entire magnification range of the scope.
First focal plane scopes are more appropriate for tactical and hunting use where adjustments are quick and manual. Second focal plane scopes are more appropriate for sniping, precision and long distance shooting where the reticle distancing marks need to be accurate and reliable.
From the end of the erector assembly the light travels to the ocular lense. The ocular lense is used to adjust the focus of the scope and the ocular assembly is also used to adjust for parallax.
Before talking about parallax, let’s talk about the shooter’s eye in relation to the scope. First, avoid scope bite. Make sure the scope is far enough away from your eye such that it won’t slam into your face from the recoil when you take a shot. Next, eye relief – this is how far your eye can be from the ocular lense and still effectively use the scope. Eye relief will determine how far back or forward your scope should be mounted in relation to your cheekweld.
Eye box is the “margin of error” a scope allows between the exit pupil and the shooter’s actual eye position. Generally lower power optics have a larger eye box and are thus easier to use and easier to quickly get on target with less searching for a sight picture.
Exit pupil is the “optical center” of the ocular lens. A larger exit pupil mean more light is coming through making the scope more useful for low light shooting. To find a scope’s exit pupil turn it’s magnification up to full and point the scope at a bright wall. Look through the scope from about one foot away and you’ll see a bright disc of light in the center of the field of view. That’s the exit pupil.
Parallax is the devil. In a nutshell parallax is the alignment of all focal planes in the scope, the shooter’s eye and the target’s actual position. When parallax is out of alignment it’s known as parallax displacement. When you’re suffering from parallax displacement your target will appear someplace where it really isn’t. Parallax is a cone (think MOA) so a key indicator of parallax displacement is bigger groups than normal.
Parallax displacement can also be determined by slowly moving your eye around. If the crosshairs and target move then you have parallax displacement. If you can move your eye and the crosshairs stay over the target then you don’t have parallax displacement. Use your scope’s parallax adjust (if available) and slowly tune it until there’s no parallax.
Parallax changes at different ranges so it may be a good idea to mark your parallax adjustments at different ranges so that you have a somewhat close starting point for adjustments in the field.
MOAs and Radians
Remember that when you take a shot there’s always human and mechanical error. These errors take place in a cone so aa 1 inch error at 100 yards is a 10 inch error at 1,000 yards (approximately). We model these in math using either Minutes of Angle (MOA) or Milliradians (MRADs). I prefer MOA simply because I learned to shoot at an Appleseed and that’s what they taught. Your mileage may vary.
Minutes of Angle (MoA)
If you remember high school geometry, there are 360 degrees in a circle. Knowing that, there are 60 minutes of angle in each degree of the circle. [Get it, like 60 seconds in a minute]. So if we know there are 360 degrees in a circle and 60 MOA in each degree, we know that there are 21,600 MOA in a circle (360 *60).
A typical scope’s adjustment is 4 clicks of adjustment = 1 MOA. That means a full circle has 86,400 clicks of adjustment.
1 MOA is 1.047 inches at 100 yards. Let’s round that down to 1 inch. MOA scales linearly with distance so 1 MOA at 100 yards is 1 inch. 1 MOA at 200 yards is 2 inches. 1 MOA at 300 yards is 3 inches, etc.
So, if you’re 1 inch off at 100 yards you need adjust your scope by 1 MOA to zero it. To move adjustment 1 MOA you would adjust it by 4 clicks. Easy peasey.
Milliradians
Radians are dumb but maybe you like them. There are 6.28318 radians in a circle. There are 1,000 milliradians per radian so therefore there are 6,283.18 milliradians in a circle. Most scopes are setup so that 1 click = 0.10 MRAD although with some scopes they use 1 click = 0.08 MRAD. It’s kind of ridiculous and needlessly complex.
0.10 MRAD (1 click) = 0.36 inches at 100 yards so 3 clicks is a little over an inch at 100 yards.
I never use milliradians because I don’t hate myself. You do you though. Maybe find a better source than me for this.
Mounting a scope
Degrease all surfaces that will be touching each other, obviously don’t degrease cam levers or parts that need to move. Go ahead just use carb cleaner. Then attach the scope base to the rifle – make sure you’re using the right screws in the right holes. If you’re attaching to a picatinny rail, make sure the scope base is fully seated against the back of the rail slot since that’s wear recoil will push it.
Now fit the scope into the scope base and put the top rings on. LIGHTLY tighten them, you should still be able to move the scope.
Adjust the position of the scope to make sure it’s not blocking the rifle’s operation, that you have appropriate eye relief and that you can get a good cheakweld.
Now it’s time to level the scope. Take your riflescope and look at a hung plumbbob. Align the verticle line of the crosshair to the plumbbob.
Finally, apply blue locktite to the ring screws and tighten them down to manufacturer specifications. Make sure that you don’t overtighten the screws. Tighten each screw a little at a time to mitigate pulling as the rings tighten. Don’t tighten one screw or one side all the way at once, tighten them all equally.
As you’re tightening your screws, regularly check to make sure that your scope is still level.